

T-110.5102 Laboratory Works in Networking and Security (5-10 cr)
Lab A3: IPv6
Description of the exercise
In this exercise you will collect knowledge about Internet Protocol version 6 (IPv6). The main task is to build a small network.
Additional reading
- RFC 4291 - IP version 6 Addressing Architecture
- RFC 4193 - Unique Local IPv6 Unicast Addresses
- RFC 2375 - IPv6 Multicast Address Assignment
- RFC 2460 - Internet Protocol, Version 6 (IPv6) Specification
- RFC 2461 - Neighbor Discovery for IP version 6 (IPv6)
- IPv6 HOWTO - Very much information about IPv6 and Linux
- IPv6 - Ubuntu Wiki - Iinformation about IPv6 and Ubuntu
- ip, route, tcpdump and scp manual pages
1. Build a small network
Set up Lab1 to act as a router.
Use the following sysctl commands (note that the last one will avoid messing up
eth0 interface. You should do the last one on all of your VMs to prevent
problems with misconfiguration.):
sudo sysctl -w net.ipv6.conf.default.forwarding=1
sudo sysctl -w net.ipv6.conf.all.forwarding=1
sudo sysctl -w net.ipv6.conf.eth0.accept_ra=0
After the following steps you should have network topology similar to the following image:
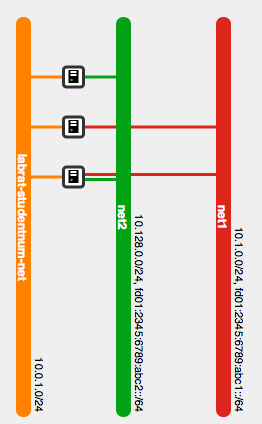
- Create two ipv6 subnets and attach them to the networks you created in previous assignment. The subnets should be fd01:2345:6789:abc1::/64 and fd01:2345:6789:abc2::/64. When creating the subnets, make sure that you disable dhcp and gateway on both of the subnets. (see neutron help subnet-create)
- Detach and re-attach the related networks from your virtual machines to force OpenStack to allocate ipv6 addresses to virtual machines. You might need commands neutron port-list, nova interface-detach and nova interface-attach.
- OpenStack does not add the IPv6 addresses to your virtual machines automatically. Manually add the ipv6 addresses allocated by openstack to your virtual machines. On lab2 and lab3 add ipv6 route to the other network using lab1 as a gateway. Make sure that you can ping lab1 from lab2 and lab3, then ensure that ipv6 routing works on lab1 by pinging lab3 from lab2. Hint: nova list shows the ipv6 addresses allocated to each of the machines.
| 1.1 | What do the above sysctl commands do? | 1 p |
| 1.2 | The subnets used belong to Unique Local IPv6 Unicast Address space. Explain what this means and what is the format of such address. | 2 p |
| 1.3 | List and explain all the OpenStack commands you used for setting up networks. | 1 p |
| 1.4 | List all commands that you used to add static addresses to the router and all the nodes and interfaces. Explain one of the add address commands. | 1 p |
| 1.5 | List the command that you used to add the route to lab3 on lab2, and explain it. | 1 p |
| 1.6 | List interface information from lab2, as well as the IPv6 routing table. Explain the IPv6 information from the interface and the routing table. What does a double colon (::) indicate? | 1 p |
| 1.7 | Start the tcpdump program on each machine. From lab2, ping the lab1 and lab3. You should get a return packet for each ping you have sent. If not, recheck your network configuration. Show the headers of successful ping return packets. Show ping6 output as well as tcpdump output. | 2 p |
2. Rebuild your network
-
On lab2, lab3: Remove all static addresses from the interfaces and run the interfaces down.
-
lab1: Install IPv6 Router Advertisement Daemon (radvd). Modify the content of radvd.conf file to be used in your network (If radvd.conf file does not exist create one under /etc directory). Radvd should advertise prefix fd01:2345:6789:abc1::/64 on eth1 and fd01:2345:6789:abc2::/64 on eth2. Start the router advertisement daemon (radvd).
Check that router advertisement packets are sent to each interface periodically.
-
Find out the neutron port-ids of the eth1 interface of lab2 and lab3 using commands neutron port-list and nova list. You need to allow multiple IPv6 addresses to be used on the interfaces. For the port attached to lab2 eth1 allow traffic with CIDR fd01:2345:6789:abc1::/64 and for lab3 eth1 port allow traffic with CIDR fd01:2345:6789:abc2::/64. The command you want to use is neutron port-update <port-uuid> --allowed-address-pairs type=dict list=true ip_address=<ip_cidr>.
-
Bring the interfaces on lab2 and lab3 up and make sure the addresses are received from the router advertisement.
Start the tcpdump on lab2 and capture all packets. Stop capturing packets after receiving first few ICMP6 packets.
Ping lab3 from lab2 using the IPv6 address allocated by radvd. You should get a return packet for each ping you have sent. If not, recheck your network configuration.
| 2.1 | Explain your modifications to radvd.conf. Which options are mandatory? | 2 p |
| 2.2 | Analyze captured packets and explain what happens when you set up the interface on lab2. | 2 p |
| 2.3 | How is the host-specific part of the address determined in this case? | 1 p |
| 2.4 | Show and explain the output of a traceroute(1) from lab2 to lab3. | 1 p |
3. Connect to the global IPv6 network
As a final assignment, we will connect one of the machines to the global IPv6 network. Currently the virtual machines don't have a native IPv6 connection to the outside world. This is because Aalto IT network does not support IPv6 at the moment. However we can still get connected.
Test first that you cannot ping for example ipv6.google.com using ping6. Now install Miredo. Try to ping again. If you don't get connection, you can try to change the Teredo server in /etc/miredo.conf. Use for example teredo.trex.fi.
| 3.1 | How does Teredo work / How can you be connected to the IPv6 network even without native support for it? | 2 p |
| 3.2 | What is your global IPv6 address? How is this address constructed? | 2 p |
4. Finishing your work
When finishing your work, please remember to backup your related files from the lab computers to a safe place (e.g. your home directory in Niksula or the Computer Center). The course does not provide any back up service for the virtual machines.