

T-110.5102 Laboratory Works in Networking and Security (5-10 cr)
Lab A1 & B1: OpenStack and networking tools
Description of the exercise
In this exercise you will set up the virtual machine environment that you are going to use throughout the course and learn to use the basic networking tools which will help you to successfully complete the rest of the assignments.
Additional reading
- OpenStack Documentation
- netcat(1) manual page
- RFC 2616 - Hypertext Transfer Protocol
Notation
Parenthesized numbers after certain keywords refer to corresponding manual page sections, where you will find further information about the keyword. For example man(1) refers to section 1 of the manual pages, and you will find further information about the keyword with command "man 1 man".
Setting up the networks and virtual machines in OpenStack
In this assignment you will learn the basic usage of OpenStack platform. You should have already configured access to OpenStack command-line client as instructed in OpenStack instructions.
It might be helpful to try these things first using graphical user interface (The OpenStack Dashboard). However, as this course is unix command line -centric, in order to receive points from this assignment you must be able to do these steps using command line.
Note that if you accidentally break something in your virtual machines, you can always destroy the virtual machine and boot new, fresh virtual machine. Always make copies of your work, as we can not guarantee the stability of virtual machines!
Make sure to read instructions carefully before beginning. There are some hints on how to accomplish the requirements at the end of each step.
1. OpenStack networking
| 1.1 |
Check available networks in Dashboard and using command neutron.
You should see two networks, ext-net and labrat-username-net. Do not touch ext-net in any circumstances! The labrat-username-net is your public network that is used for accessing internet. Hint: neutron help |
1p |
| 1.2 |
Create two new networks. You are free to choose the names yourself,
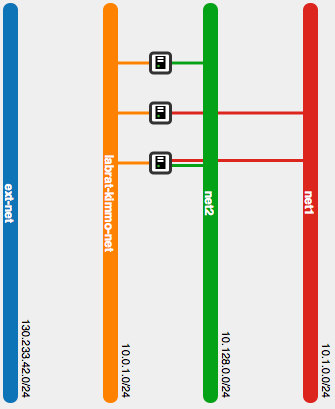
but use subnets 10.1.0.0/24 and 10.128.0.0/24 for the networks. Do not set gateways in these networks. Provide the commands you used for creating networks. Hint: neutron net-create and neutron subnet-create |
1p |
| 1.3 | Create rules in default security group to allow ping (ICMP) and SSH (TCP 22) to instances. See OpenStack documentation for help. Provide the commands you used. | 1p |
2. OpenStack virtual machines
| 2.1 | Create three new virtual machine instances using ubuntu 14.04 image and flavor m1.tiny.
The names of the machines should be lab1, lab2 and lab3. Each instance should have first network interface (traditionally called eth0 in linux) connected to the given labrat-username-net. In addition lab1 should have connections to both networks you created in previous step. lab2 should have second interface connected to subnet 10.1.0.0/24 and lab3 to 10.128.0.0/24. Make sure that you assign your public key and the default security group with instances. Provide the commands you used for creating instances. |
3p |
| 2.2 | For lab1 assign floating ip from 130.233.42.0/24 network to first network interface after you have created the instance. Course staff has allocated the floating ip for you, so you just assign it for your instance. | 1p |
Check your results using Dashboard: Network -> Network Topology. You should see something similar to this:
Verify that you can ssh to lab1 using the floating ip from echo. The username is ”ubuntu”. Also verify that you can ssh from lab1 to lab2 & lab3. Use ssh agent forwarding when connecting from echo to lab1 or copy the private key to lab1 to allow login to lab2 & lab3.
Hints:- List available images with glance image-list
- nova help boot gives information on instance creation
- neutron commands floatingip-list and floatingip-associate are needed to get the floating ip
- neutron port-list
| 2.3 | Set up the network interfaces you created in step 2.1 (eth 1 and eth2 on lab1, eth1 on lab2 and lab3) in instances to use DHCP.
Make the configuration permanent by creating configuration files in folder /etc/network/interfaces.d for each of your virtual machines.
Ensure that you can ping other instances over all of the three networks. Hint: You might want to do the 3. Networking basics exercises first on a single virtual machine to get familiar with the networking before trying to connect to lab2 and lab3. |
2p |
3. Networking basics
| 3.1 | Using ip(8), find all the active interfaces on your machine. | 1 p |
| 3.2 | Using netstat(8) and arp(8), find the MAC address of the default router of your machine. | 1 p |
| 3.3 | From resolv.conf(5), find the default name servers and the internet domain of your machine. How is this file generated? |
1 p |
| 3.4 | Using dig(1), find the responsible name servers for the cse.hut.fi domain. | 1 p |
| 3.5 | Using dig(1), find the responsible mail exchange servers for cse.hut.fi domain. | 1 p |
| 3.6 | Using ping(8), send 5 packets to aalto.fi and find out the average latency. Try then pinging Auckland University of Technology, aut.ac.nz, and see if the latency is different. | 1 p |
| 3.7 | Using traceroute(1), find out how many hops away is google.fi Why does this address sometimes produce different results on different traceroute runs? |
1 p |
4. Examining the request and response messages of clients and servers using netcat
| 4.1 | Using netcat, nc(1), capture the version number of the ssh daemon running on your machine. | 1 p |
| 4.2 | Using netcat, nc(1), craft a valid HTTP/1.1 request for getting HTTP headers (not the html file itself) from the front page of www.aalto.fi. What request method did you use? Which headers did you need to send to the server? What was the status code for the request? Which headers did the server return? Explain the purpose of each header. | 2 p |
| 4.3 | Using netcat, nc(1), start a bogus web server listening on the loopback interface port 8080. Verify with netstat(8), that the server really is listening where it should be. Direct your browser lynx(1) to the bogus server and capture the User-Agent: header. | 2 p |
| 4.4 | With similar setup to 4.3, startup a bogus ssh server with nc and try to connect to it with ssh(1). Copy-paste the server version string you captured in 4.1 and see if you get a response from the client. What is the client trying to negotiate? | 1 p |